Codex CLI: Build an App and Deploy It to a VPS (Step by Step, 2026)
Short answer: Rent a small Ubuntu server (a Hostinger KVM 2 is $7.03 a month with our link), install Codex with one command, and sign in with your ChatGPT Plus plan ($20 a month). Then tell Codex what app to build. Your app is live on the web in about 30 minutes.
Get a Hostinger VPSCodex CLI is OpenAI’s AI coding agent. It runs in a terminal (a text window where you type commands). You tell it what you want in plain English, and it writes the code, runs it and fixes its own mistakes. This is vibe coding, done right on the computer your app will live on.
In this guide you put Codex on a VPS (a computer you rent that stays on all day), have it build a small web app, and put that app online.
What you’ll have at the end
- Your own server, with Codex installed and signed in
- A working web app that anyone can open in a browser
- Optional: the app on your own domain, with the padlock (HTTPS)
What you need before you start
- A ChatGPT plan that includes the Codex CLI. Codex’s sign-in screen says usage is included with Plus, Pro, Business, and Enterprise plans. Plus is $20 a month. You can use an OpenAI API key instead and pay per use.
- A computer with a web browser. You do everything through the browser. You don’t install anything on your own computer.
- A credit or debit card for the server.
- About 30 minutes.
- A domain name (optional). Hostinger gives you one free for a year with a 24-month VPS.
How much it costs
| What | Price | Notes |
|---|---|---|
| Hostinger KVM 2 VPS | $7.03/mo ($168.77 for 24 months) | With our referral link, checked Nov 8, 2026. Renews at $14.99/mo. |
| ChatGPT Plus | $20/mo | Includes Codex in the CLI. Pro plans start at $100/mo for heavy use. |
| Domain | Free for 1 year | Comes with a 24-month Hostinger VPS |
Codex’s AI runs on OpenAI’s computers, not your server. So your server can be small. KVM 1 (4 GB of memory) also works. We pick KVM 2 (8 GB) so there’s room to build bigger apps and run a database later.
Part 1: Get your server
Step 1: Open Hostinger’s VPS page with our discount
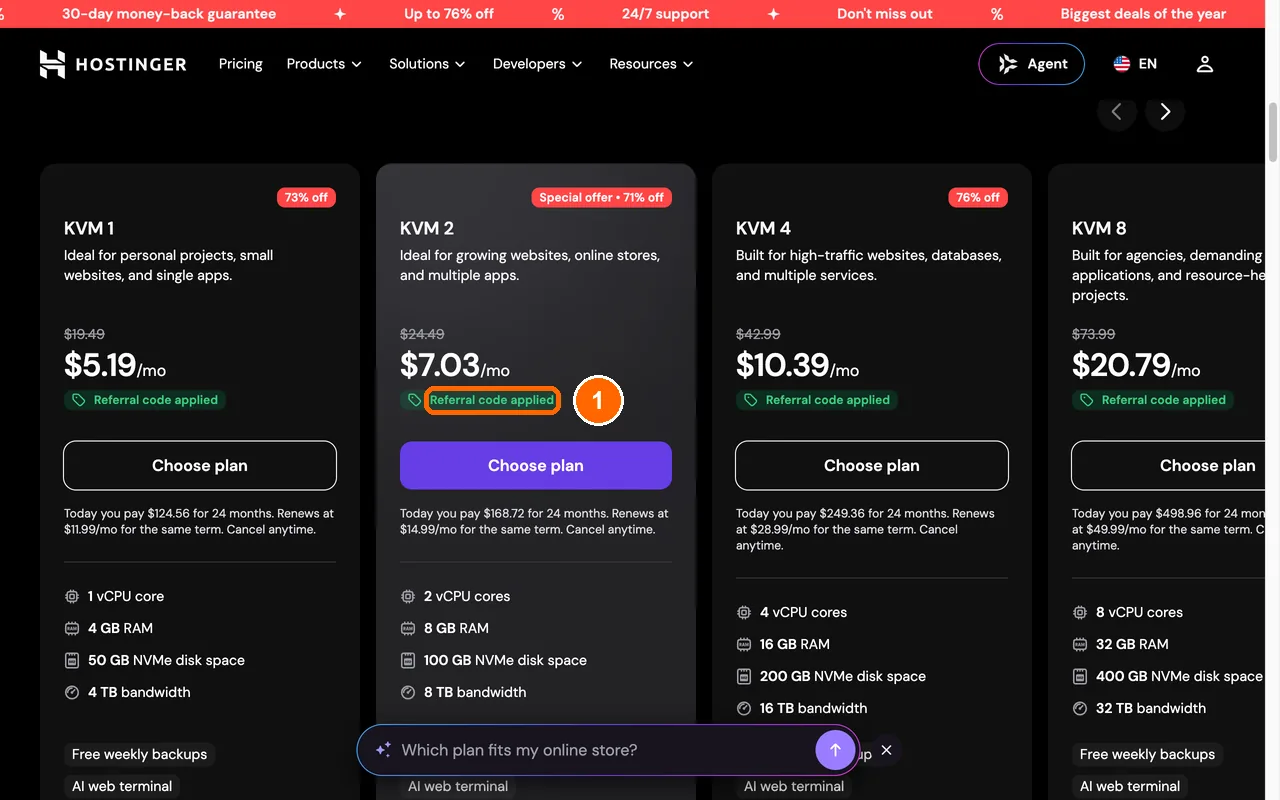
Click this button: Open Hostinger VPS plans
What you’ll see: 4 plan boxes. Under each price is a small green label that says Referral code applied. That means our 20% discount is on.
Stuck? If a box about cookies pops up, click Opt out. The page works the same.
Step 2: Click Choose plan under KVM 2
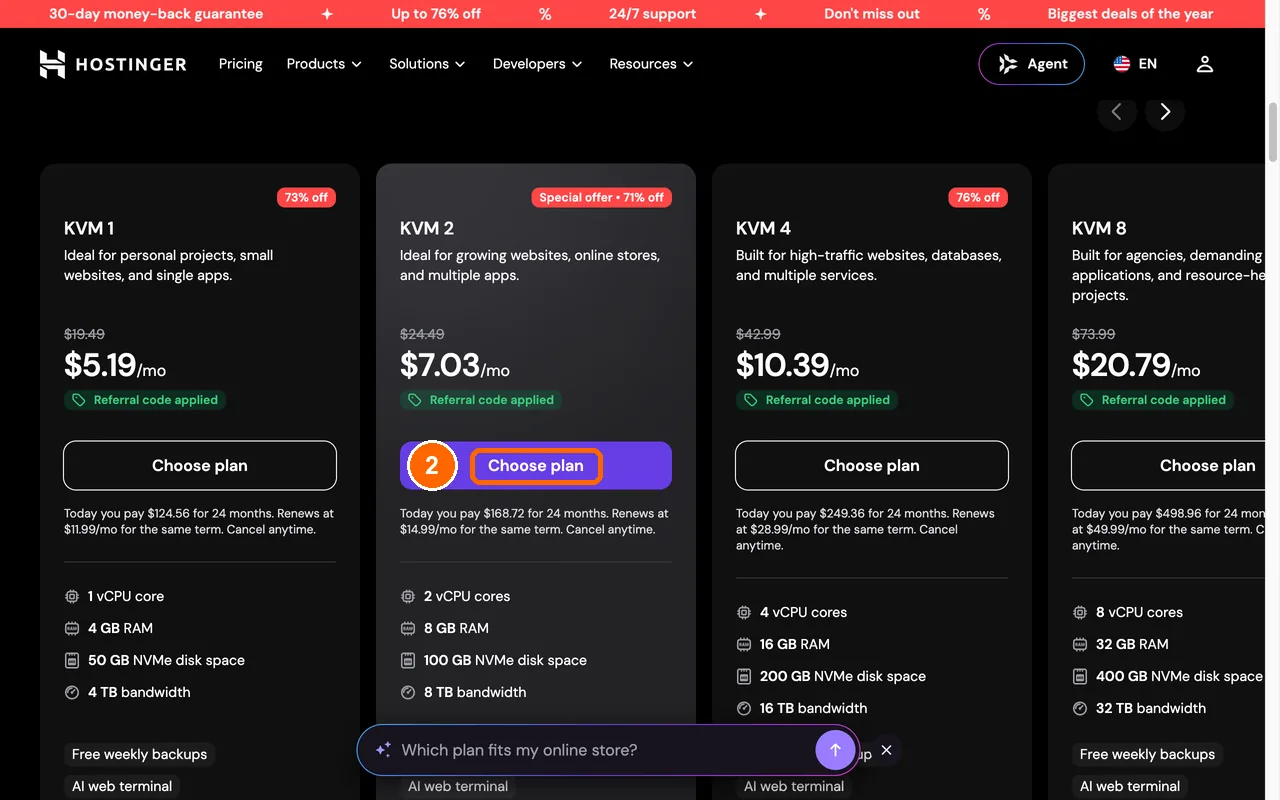
Find the second box. It’s called KVM 2. Click the purple button in it that says Choose plan.
What you’ll see: a page called Your cart.
Step 3: Leave the period on 24 months
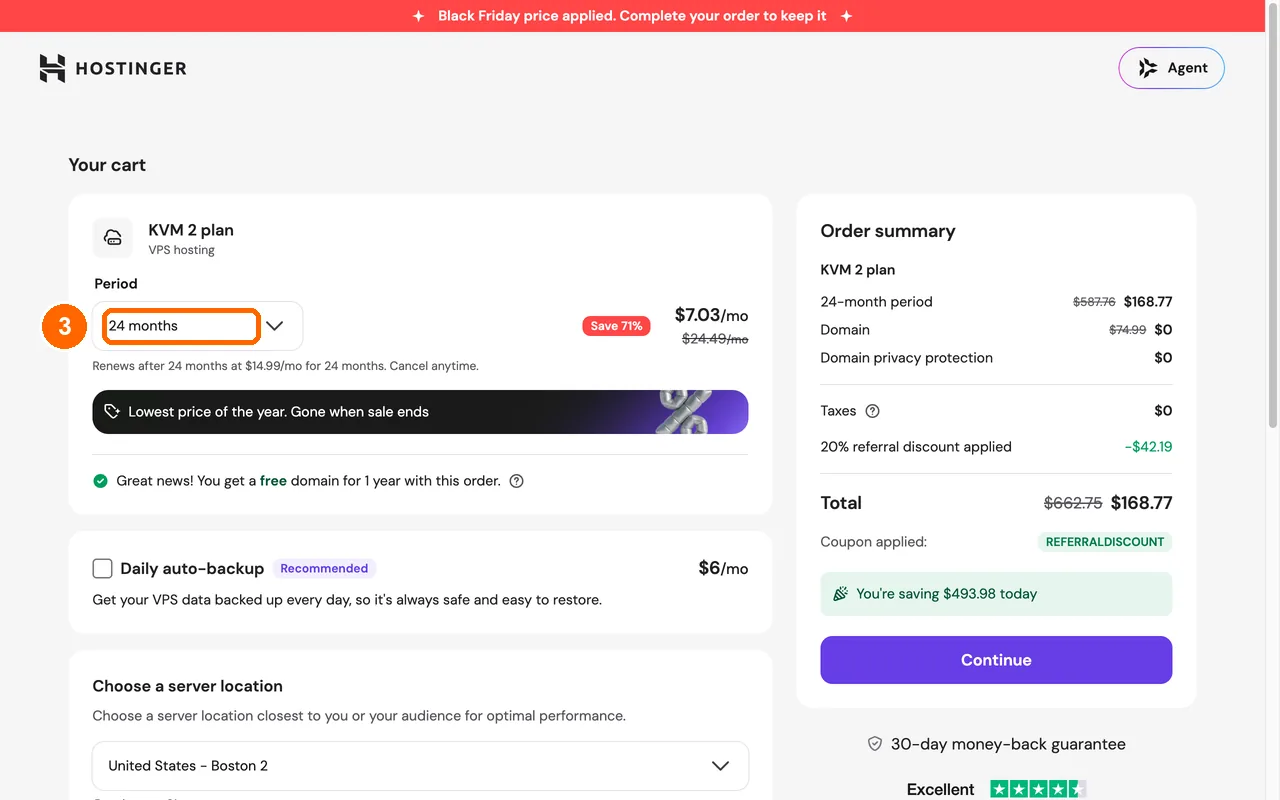
Look at the box under Period, near the top left. Leave it on 24 months. That’s the lowest price, $7.03 a month.
What you’ll see: the total near the bottom is about $168.77, with REFERRALDISCOUNT under it.
Step 4: Click the Ubuntu tile
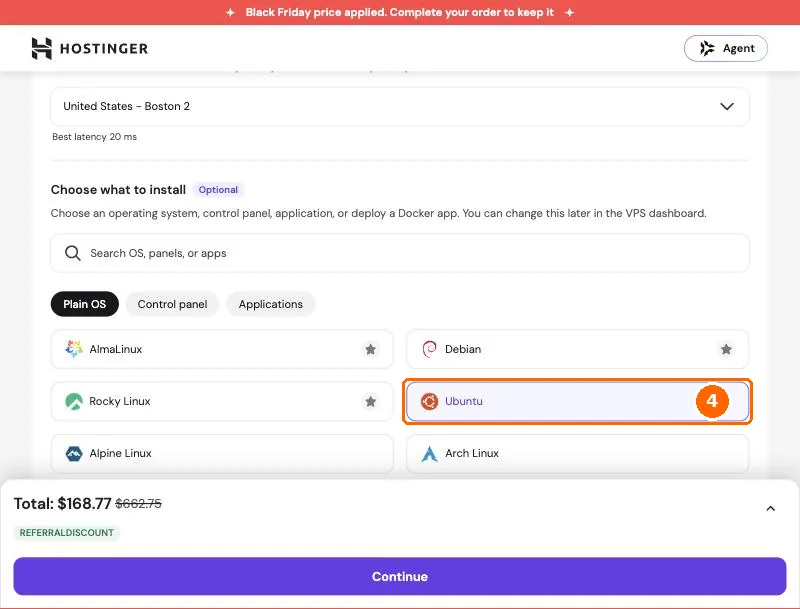
Scroll down to Choose what to install. The Plain OS tab is already open. Click the tile that says Ubuntu.
Ubuntu is the system your server runs, like Windows on a PC. It’s free.
What you’ll see: a box about Ubuntu opens.
Step 5: Pick Ubuntu 24.04 LTS
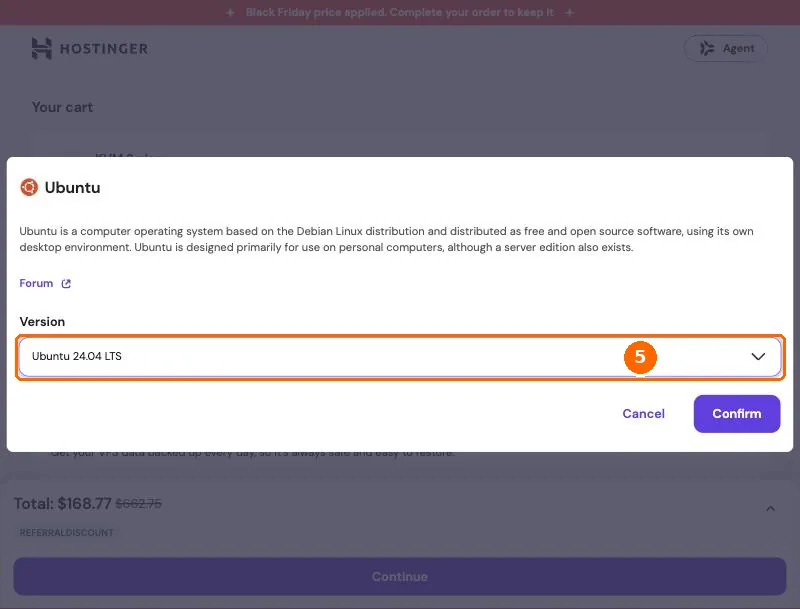
Click the list under Version. Pick Ubuntu 24.04 LTS.
We tested every command in this guide on Ubuntu 24.04. LTS means it gets safety updates for years.
Step 6: Click Confirm
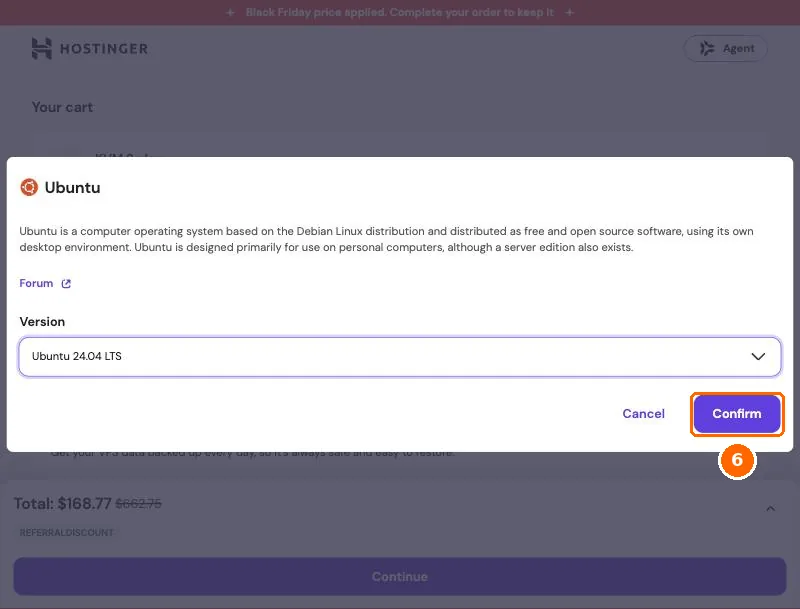
Click the purple Confirm button at the bottom right of the box. This only picks Ubuntu. You don’t pay yet.
What you’ll see: the box closes. The Ubuntu tile now has a purple border.
Step 7: Click Continue, then pay
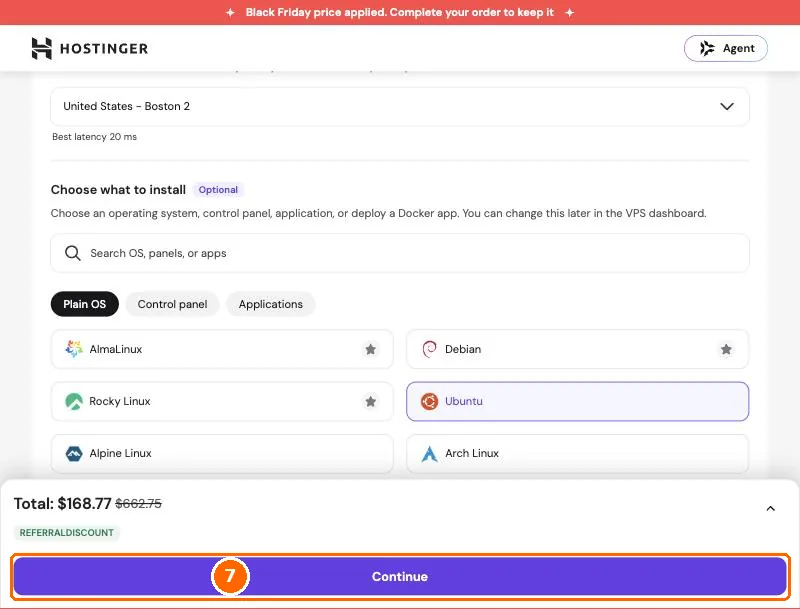
Click the big purple Continue button at the bottom. Make your Hostinger account (or log in), then pay with your card.
What you’ll see: Hostinger walks you through setting up the server. If it asks for a root password, make one. Root is the main admin account on your server. Save the password somewhere safe. Hostinger then builds your server. This takes a few minutes.
Part 2: Open your server and add the tools
Step 8: Open the Web Console
In Hostinger, go to VPS and click Manage next to your server. On the Overview page, click Web Console.
What you’ll see: a new browser tab with a black screen and a line ending in #. That’s your server’s terminal. Hostinger usually logs you in for you.
Stuck? If it asks for a login, type
rootand press Enter. Then type your root password and press Enter. The password stays invisible while you type. That’s normal.
Step 9: Paste the setup command
Copy this whole line. Click in the black terminal, paste it, and press Enter:
apt update && apt install -y caddy bubblewrapThis adds 2 free tools. Caddy is a web server. It shows your app to visitors. Bubblewrap lets Codex work in a safe “sandbox” so it can’t change things outside your project.
What you’ll see: lots of text scrolls by for about a minute. When the # line comes back, it’s done.
Stuck? If paste doesn’t work, try Ctrl+Shift+V on Windows or Cmd+V on a Mac. Or right-click and pick Paste.
Step 10: Make a folder for your app
Paste this and press Enter:
mkdir -p /var/www/myapp && cd /var/www/myappThis makes a folder called myapp and moves you into it. Codex will build your app here.
What you’ll see: nothing new, just a fresh line. The line now shows /var/www/myapp.
Part 3: Install Codex and sign in
Step 11: Install Codex
Paste this and press Enter:
curl -fsSL https://chatgpt.com/codex/install.sh | shThis is OpenAI’s official installer. It downloads Codex and puts it in place.
What you’ll see: lines that start with ==>. Near the end, one says Current terminal: and shows a command.
Step 12: Tell this terminal where Codex is
Paste this and press Enter:
export PATH="$HOME/.local/bin:$PATH"You only need this once. New terminals find Codex on their own.
What you’ll see: nothing new. That’s fine. Type codex --version and press Enter to check. It should show a version number.
Step 13: Turn on device code sign-in in ChatGPT
Your server has no web browser. So you sign in with a short code instead. ChatGPT needs to allow this first.
On your own computer, open ChatGPT. Click your profile picture, then Settings, then Security. Turn on Device code authorization.
Stuck? On a Business or Enterprise plan, the switch may be missing or grey. Your workspace admin has to turn it on for you.
Step 14: Start Codex
Back in the Web Console, paste this and press Enter:
codexWhat you’ll see: Welcome to Codex and 3 choices:
- Sign in with ChatGPT
- Sign in with Device Code
- Sign in another way
Step 15: Pick Sign in with Device Code
Press the down arrow key once so 2. Sign in with Device Code is picked. Press Enter.
What you’ll see: a link, https://auth.openai.com/codex/device, and a one-time code. The code expires in 15 minutes.
Don’t pick choice 1. It tries to open a browser on the server, and there isn’t one.
Step 16: Enter the code on your computer
On your own computer, open auth.openai.com/codex/device. Sign in to ChatGPT if it asks. Type the code from the terminal, then approve.
What you’ll see: back in the terminal, Codex says you’re signed in. If it asks whether to trust this folder, say yes. Then you see a box that says Ask Codex to do anything.
Only enter a code you started yourself. If a website or a stranger gives you a code, don’t use it.
Part 4: Build your app
Step 17: Tell Codex what to build
Click in the box, paste this prompt and press Enter:
Build a tip calculator web app in this folder. Put everything in one index.html file with HTML, CSS and JavaScript, and no build step. Let me enter the bill, pick a tip percent, and split it between people. Make it look clean and work well on phones.Swap in your own idea if you like. Keep it to plain HTML, CSS and JavaScript for your first app. It’s the easiest kind to put online.
What you’ll see: Codex makes a plan, writes the file and tells you what it did. It takes a minute or two.
Stuck? If Codex asks for permission to run a command, read the command. If it only touches your app folder, choose yes.
Step 18: Ask for changes
Type changes the same way. For example: “Make the buttons bigger” or “Add a dark mode.” Codex edits the file each time.
When you’re happy, type /quit and press Enter to leave Codex. Your files stay in the folder.
Part 5: Put it online
Step 19: Point Caddy at your app
Paste this and press Enter:
sed -i 's#/usr/share/caddy#/var/www/myapp#' /etc/caddy/Caddyfile && systemctl reload caddyThis tells Caddy to show the files in your app folder.
What you’ll see: nothing new. No news is good news here.
Step 20: Open your app
Find your server’s IP address (a number like 123.45.67.89). It’s on the Overview page in Hostinger. Type it into a new browser tab, like http://123.45.67.89, and press Enter.
What you’ll see: your tip calculator. It’s live on the internet.
Check that it worked
Open the IP address on your phone, with Wi-Fi off. If the app loads, anyone in the world can open it. Then go back to the terminal, run codex in /var/www/myapp, ask for a change, and reload the page. You should see the change right away.
Add your own domain (optional)
A domain like mytipapp.com looks better than an IP address, and Caddy gives it the padlock (HTTPS) for free.
- Point the domain at your server. In your domain’s DNS settings, make an A record. Set the name to
@and the value to your server’s IP address. If your domain is at Hostinger, this is in hPanel under Domains, then DNS / Nameservers. - Wait. DNS changes take from a few minutes to a few hours.
- Tell Caddy your domain. Paste this, but change
mytipapp.comto your domain first:
sed -i 's#^:80 {#mytipapp.com {#' /etc/caddy/Caddyfile && systemctl reload caddyOpen https://mytipapp.com. Caddy gets the padlock certificate on the first visit. It may take a few seconds.
If something went wrong
“Could not get lock” after the setup command. Ubuntu is still updating itself in the background. Wait 5 minutes and paste the command again.
“codex: command not found.” The terminal doesn’t know where Codex is yet. Paste the line from Step 12 again.
The device code doesn’t work. Device code authorization is off. Do Step 13, then run codex login --device-auth to get a new code.
The IP address shows a Caddy welcome page. Caddy still points at its old folder. Paste the command from Step 19 again.
The page doesn’t load at all. Check that you typed http://, not https://, before the IP address. If you turned on Hostinger’s firewall, add rules that allow ports 80 and 443.
Going further: an app with logins or a database
The tip calculator is a front-end app. It runs in the visitor’s browser. Apps with user accounts or saved data also need a back end that runs on the server all day. Codex can set that up too. Try a prompt like this:
Turn this into a Node.js app with a SQLite database. Install anything you need. Run it on port 3000 with a systemd service so it restarts after a reboot. Then change /etc/caddy/Caddyfile so Caddy sends visitors to localhost:3000, and reload Caddy.Codex will ask before it installs things or changes system files. Read each request before you say yes. Before you invite real users, run the safety checklist in our vibe coding guide.
FAQ
Is Codex CLI free? The software is free and open source. To use it, you need a ChatGPT plan that includes Codex (Plus at $20 a month or higher) or an OpenAI API key, which you pay for per use.
Does Codex CLI need Node.js? No. The official installer adds Codex on its own. You only need Node.js if you install with npm install -g @openai/codex.
Why install Codex on the server instead of my laptop? Codex can build and test the app in the same place it runs. Nothing to upload. You can also close your laptop and come back later from any computer through the Web Console.
Can I use Claude Code instead? Yes. The server steps are the same. Install Claude Code instead of Codex in Part 3 and sign in with your Claude plan.
How much server do I need for Codex? Very little, because the AI runs on OpenAI’s computers. 4 GB of memory is plenty for small apps. Pick 8 GB if you’ll add a database or run several apps.
Is my login safe on the server? Codex saves your sign-in in ~/.codex/auth.json. OpenAI says to treat that file like a password. Don’t share it or put it on GitHub.
Next: What is vibe coding? Or compare app hosts in Hostinger vs Vercel.
Tested by WebHostCompared on November 8, 2026. We walked the Hostinger KVM 2 checkout with Ubuntu 24.04 up to the payment page, ran Codex CLI 0.167.0 to its sign-in screen, and ran the Caddy and Bubblewrap commands on Ubuntu 24.04. Prices checked live with our referral link that day.
Sources
- Codex CLI, OpenAI, checked Nov 8, 2026
- Codex authentication and headless login, OpenAI, checked Nov 8, 2026
- Codex pricing, OpenAI, checked Nov 8, 2026
- Codex sandboxing on Linux, OpenAI, checked Nov 8, 2026
- How to use the Hostinger VPS Web Console, Hostinger, checked Nov 8, 2026
- Device code auth for Codex, Luca Berton, for the ChatGPT setting’s location